Welcome to my baking blog. While I've always enjoyed cooking and baking, it's only been in the last year or so that I've become interested in the art and science of creating beautiful delectable desserts.
Please join me as I journal my way through the kitchen, cooking up delicious and creative sugary treats!
Disclosure: This blog contains affiliate links. This means that if you click on a link, I may earn a commission if you make a purchase via that link, at no additional cost to you. Thanks for your support! :)
Monday, December 17, 2029
Tuesday, December 16, 2014
Spiced Cheesecake with Vanilla Sour Cream Topping

My family has always considered cheesecake to be part of a holiday meal so we always have a cheesecake on the table next to the pumpkin and fruit pies. This recipe begins like a standard cheesecake but it has a couple of delicious deviations.
The secret ingredient, a light sprinkling of cinnamon, makes all the difference and adds a festive note while not getting all up in your face and screaming CINNAMON! In fact, I suggest you challenge your friends and loved ones to name the the thin layer of spice between the main body of the cheesecake and the delicious sweet sour cream topping.
The family member that gave me this recipe claims it is based upon the crustless cheesecake served by the Gondolier Restaurant in Boulder, Colorado. For my version, I recommend using a good old-fashioned graham cracker crust. For extra credit, try making a batch of your own graham crackers to smoosh up for the crust. I recommend this one from Smitten Kitchen.
Graham Cracker Crust:
1 1/2 C graham cracker crumbs
6 Tbsp melted butter
Cheesecake Base:
16 oz cream cheese (at room temperature)
1 C sugar
1 Tbsp lemon juice
2 tsp vanilla
dash salt
4 eggs, beaten
cinnamon for sprinkling
Vanilla Sour Cream Topping:
16 oz sour cream
2 Tbsp sugar
1 tsp vanilla
Instructions:
1. Preheat oven to 325.
2. Prepare graham cracker crust by combining graham cracker crumbs and melted butter in a bowl. Once all the crumbs are moistened and sticking together, press into a 9-inch springform pan. Set aside.

3. With electric mixer (a stand or a hand mixer will work), beat cream cheese until fluffy.

4. Gradually beat in sugar, lemon juice, salt and vanilla.
5. Add beaten eggs.
6. Pour into crust and bake for 40-50 minutes (check to make sure it isn't runny).

7. While the cheesecake is baking, mix the sour cream, sugar and vanilla together to make topping.
8. Remove cheesecake from the oven and sprinkle the cheesecake with a layer of cinnamon.

9. Drop the sour cream topping on the cake by the spoonful then spread evenly. Return to oven for 10 minutes.

10. Cool completely, then chill.

Tuesday, November 4, 2014
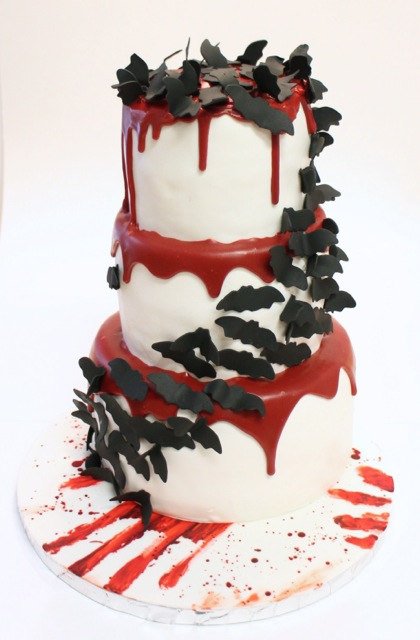
A collection of Halloween cakes
I hope you had a frightfully fun Halloween! Halloween is perhaps my favorite holiday and I always love to make a cake for the occasion. I thought it would be fun to share this year's Halloween cake, along with a few favorites from past years.
This year I decided to do a play on the popular wedding cake with fluttering butterflies flying around. Instead, my cake featured a colony of bats and some dripping blood for good measure.
I made the blood as a "ganache" of sorts using Wilton candy melts instead of regular chocolate and the bats were all cut with a little bat cutter out of black gumpaste. I made the cake chocolate using black cocoa powder. I love black cocoa powder. Not only does it make for an excellent black cake for Halloween but it tastes rich and delicious. A cake should taste as good as it looks!
Friday, February 25, 2011
Coraline cake
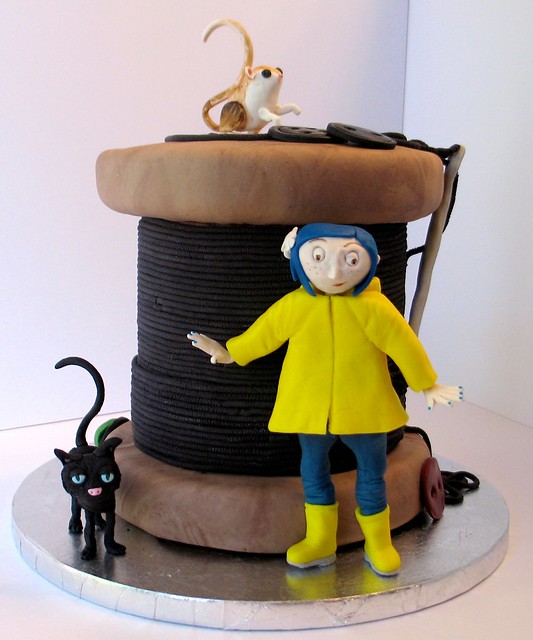
This weekend there is a local cake competition here in Austin. Last year I went to "That Takes the Cake" and looked at all the fabulous cakes, but I didn't really feel ready at the time to enter. So I've been looking forward to entering the competition for the last year.
It took me awhile to figure out what to make. A friend of mine suggested "Coraline" and I thought it would make a great cake. I should have taken pictures as I constructed this cake. It's hard to get an idea of scale from the photos.
The figures are all modeled out of gumpaste and/or fondant. The mouse is hand-painted with food coloring.
The cake itself is two 8-inch cakes on the top and bottom with four 6-inch cakes stacked in the middle. The four cakes in the middle are all frosted together. I treated this as a 3-tier cake, essentially, icing and covering each section independently and then dowling on each layer.
I was pretty nervous about getting Coraline to look right and I think, for the most part, I was successful. I think I'm going to be holding my breath all weekend that the whole thing stays together. I remember seeing some partly collapsed cakes last year and thinking it was such a shame. We'll see how it goes!
Sunday, November 14, 2010
Pumpkin Chocolate Chip Cupcakes with Cinnamon Cream Cheese Icing

This cupcake recipe is actually based on the pumpkin quick bread recipe from The Joy of Cooking. I've changed up the flour, altered some of the spicing and switched the mixing methodology (oh, and added chocolate chips) to create a delicious little cupcake recipe.
I'm usually not much of a cupcake gal, but I just don't think this would work well as cake. Plus, for holiday get-togethers, cupcakes work really well. (If you'd like to make the little pumpkin pie toppers, check out the tutorial over at The Frosted Cake 'N Cookie.)
Pumpkin Chocolate Chip Cupcakes
2 1/2 C cake flour *
2 1/4 tsp cinnamon
1 tsp ginger
1/4 tsp cloves
2 tsp pumpkin pie spice **
1 1/2 tsp baking soda
1/2 tsp baking powder
1 1/2 tsp salt
9 Tbsp butter, room temperature
1 1/2 C sugar
1/2 C packed dark brown sugar
3 eggs
1 1/2 C pumpkin (almost an entire can)
1/2 C milk
1 tsp vanilla
1 1/2 C chocolate chips
* You can use all purpose flour, just reduce the amount by 1/4 C
** You can omit the pumpkin pie spice if you don't have it. Just add in a little bit of cinnamon, ginger, cloves, allspice, and/or nutmeg. Or not. These are plenty spicy without the addition.
1. Preheat the oven to 350 and prepare cupcake pans with paper liners.
2. Sift together flour, spices, baking soda, baking powder, and salt. Set aside.
3. Cream butter and sugars together
4. Beat the eggs together and slowly beat into the butter, scraping down the sides of the bowl before and after.
5. Mix together the pumpkin, milk and vanilla in a bowl.
6. Beat in the flour and pumpkin mixture, alternating in small batches. Start and end with the flour mixture.
7. Stir in the chocolate chips.
8. Scoop the mixture into the cupcake pans and bake for 20 minutes.
9. Cool completely before icing.
Makes ~30 cupcakes.
Cinnamon Cream Cheese Icing
16 oz cream cheese (two bricks), room temperature
8 Tbsp butter, room temperature
4 tsp vanilla
2 tsp cinnamon
3 C powdered sugar
1. Beat cream cheese and butter until fluffy
2. Beat in vanilla and cinnamon
3. Slowly beat in powdered sugar in three batches, scraping down the bowl between batches
Tuesday, October 12, 2010
Malted Brown Butter Waffles
I'm not a pancake person, but I do love waffles. Mostly I eat them for dinner when I don't know what else to have. I can really eat breakfast for any meal of the day.
I searched for the right waffle recipe for a long time. I finally found one that was almost perfect, it just needed a little tweaking. The Brown Butter Waffles from The Craft of Baking: Cakes, Cookies, and Other Sweets with Ideas for Inventing Your Own by Karen DeMasco is quite good, but it's overly sweet. Actually, I regret that I have to say that nearly everything I've made from that book is far too sweet. However, with some adjustments, these waffles are great.
I reduced the sugar, swapped half the flour for whole wheat and added some barley malt syrup for a nice malted flavor. Sometimes I throw in a few tablespoons of flaxseeds and/or oats just to make them a little healthier. You can also omit the sugar completely if you want, but I do like just a hint of sweet actually in the waffle itself.
I confess, it's a bit of a production between browning the butter and whipping up the egg whites, but I'll do a little extra when I'm having breakfast for dinner.
Malted Brown Butter Waffles
6 Tbsp butter, cut into pieces
1/2 C whole wheat pastry flour or white whole wheat flour
1/2 C all purpose flour
2 Tbsp turbinado or light brown sugar
1 tsp baking powder
1/4 tsp baking soda
1/2 tsp salt
1 C buttermilk
2 large eggs, separated
1 1/2 Tbsp barley malt syrup
1. In a small saucepan, melt the butter over medium-high heat, approximately 5 minutes until the butter is brown and has a nutty fragrance.
2. Whisk the flour, sugar, baking powder, baking soda, and salt in a bowl together.
3. In a separate bowl combine the barley malt syrup, buttermilk and egg yolk and add to the dry ingredients, stirring until just combined.
4. Add the brown butter and stir until fully incorporated.
5. Beat the egg whites to soft peaks
6. Gently fold the egg whites into the rest of the batter.
Disclosure: This blog contains affiliate links. This means that if you click on a link, I may earn a commission if you make a purchase via that link, at no additional cost to you. Thanks for your support! :)
I searched for the right waffle recipe for a long time. I finally found one that was almost perfect, it just needed a little tweaking. The Brown Butter Waffles from The Craft of Baking: Cakes, Cookies, and Other Sweets with Ideas for Inventing Your Own
I reduced the sugar, swapped half the flour for whole wheat and added some barley malt syrup for a nice malted flavor. Sometimes I throw in a few tablespoons of flaxseeds and/or oats just to make them a little healthier. You can also omit the sugar completely if you want, but I do like just a hint of sweet actually in the waffle itself.
I confess, it's a bit of a production between browning the butter and whipping up the egg whites, but I'll do a little extra when I'm having breakfast for dinner.
Malted Brown Butter Waffles
6 Tbsp butter, cut into pieces
1/2 C whole wheat pastry flour or white whole wheat flour
1/2 C all purpose flour
2 Tbsp turbinado or light brown sugar
1 tsp baking powder
1/4 tsp baking soda
1/2 tsp salt
1 C buttermilk
2 large eggs, separated
1 1/2 Tbsp barley malt syrup
1. In a small saucepan, melt the butter over medium-high heat, approximately 5 minutes until the butter is brown and has a nutty fragrance.
2. Whisk the flour, sugar, baking powder, baking soda, and salt in a bowl together.
3. In a separate bowl combine the barley malt syrup, buttermilk and egg yolk and add to the dry ingredients, stirring until just combined.
4. Add the brown butter and stir until fully incorporated.
5. Beat the egg whites to soft peaks
6. Gently fold the egg whites into the rest of the batter.
Disclosure: This blog contains affiliate links. This means that if you click on a link, I may earn a commission if you make a purchase via that link, at no additional cost to you. Thanks for your support! :)
Monday, September 27, 2010
Perfect Fondant: Tips for Covering a Cake Flawlessly
UPDATE Jan 3, 2015- Please visit the bottom of the post for answers to frequently asked questions from the comments. :)
Disclosure: This blog contains affiliate links. This means that if you click on a link, I may earn a commission if you make a purchase via that link, at no additional cost to you. Thanks for your support! :)
When I was first teaching myself to work with fondant, I found one of the hardest parts was actually covering the cake and having it look smooth. I struggled with pleats around the bottom, cracking and tearing fondant and corn starch or powdered sugar spots all over the fondant.
I looked at pictures and instructions, watched youtube videos and read forums. While there is a lot of good information out there, I felt like there was a lack of good suggestion all in once place or the videos went by so quickly. I watched adept hands make quick work of covering a cake with no issues and I struggled to figure out what they were doing.
I'm going to take you through my biggest tips and pointers for getting a nice finish so you can learn to cover your cake without pleating, tearing, holes, or any other frustrating issues that have you beating your head against the counter. This is good for those new to fondant as well, however, I will say that watching videos does help immensely so combine my information with some other videos and information out there.
Tip 1: Start with the right fondant
I originally used marshmallow fondant. While it's easy to make and I've seen other people achieve professional-looking results with it, I found it sticky and hard to work with and I had issues getting it the right consistency. I started making fondant from scratch and the best recipe and the one I use all the time is Michele Foster's Fondant recipe. A half batch (what I usually make) will cover up to one 10-inch round and it's actually not all that hard to make.
One thing I found that really helped me was to buy a package of pre-made, high quality fondant to see what the consistency was like. That way I could better achieve the correct consistency when making it at home. I bought a container of Satin Ice, but I've heard good things about FondeX. Just avoid the Wilton stuff, okay? (Ick!)
Tip 2: Get your icing as smooth as possible
The icing on your cake (under the fondant) should be as smooth and hard as possible. For this reason, many people really like working with ganache under fondant. You can get it as smooth as glass and it sets up as hard as a rock. I like ganache, but it's really rich and expensive so I mostly work with meringue buttercreams under my fondant which also provide a nice smooth surface. I use metal bench scraper and an icing spatula to get my buttercream smooth before I apply my fondant.

Tip 3: Knead your fondant in pieces
I divide my fondant into several pieces to knead it. Then I zap each piece in the microwave for two 5-second increments to soften it slighty (no more than 5 seconds per zap or you'll melt it!) and then I work it on the counter. I keep the other chunks wrapped in plastic wrap so that they don't get dry and crusty while I work.

While I'm kneading each section, I add a dollop of shortening and a dollop of glycerine to soften the fondant and make it smoother and more pliable. The shortening also helps the fondant to be less sticky. That way, you can use less corn starch (or powdered sugar) when you're rolling. Corn starch and powdered sugar leave white stuff everywhere and can dry out your fondant.

Once you've gotten all the chunks kneaded individually, put them together and knead the fondant until it's warm, soft, smooth and pliable. Remember silly putty? It should be a lot like that in consistency.

Tip 4: Put away the spray bottle
I had always read that you should spray the cake with water (after frosting) before putting the fondant on. This never worked properly for me. The coverage was always uneven, with some spots too wet and some too dry, and the fondant was always slipping around and gooey. What a mess!
Then I watched someone apply piping gel with a pastry brush on youtube. Ding! I don't generally have piping gel on hand, but the pastry brush works perfectly. I generally use water with a small amount of tylose powder dissolved in it (which is what I use to adhere pieces of fondant or gumpaste together when making my figures or applying them to the cake). But water works, too. The coverage is nice and even and you can apply it pretty thinly. It also helps do some final smoothing on your cake. Win!

Tip 5: Use your corn starch or powered sugar sparingly
Less is more. My preferred anti-stick is corn starch. Really, you don't need much corn starch to keep the fondant from sticking to your counter and rolling pin. I dust just a slight amount on my slightly flattened disc of fondant, rub it around, flip and do the same on the other side. Then I sprinkle a small amount around the countertop where I'll be rolling.

As I roll, I put my hands under and all around the edges to make sure it isn't sticking to the counter. If need be, I sprinkle just a bit underneath and rotate the fondant slightly to distribute.

Tip 6: Roll it out bigger than you think it needs to be
Measure your cake across the top and sides. Got that added up? Great, add another 2 inches to the dimension. So if you measured 10 inches across the top and your cake is 3 inches tall, that's 16 inches of cake total. Roll out the fondant to at least 18 inches. I actually like a little more. More fondant along the bottom means you have more to work with when it comes to lifting and smoothing around the bottom and less opportunity for pleating and folding along the bottom.
Tip 7: Roll it up
When you're ready to put it onto the cake, roll the whole thing back onto your rolling pin. Don't try to lift it with your arms or your hands and put it onto the cake. You'll get more air bubbles if you try to do it like that. The rolling pin method allows you to roll it slowly over the top of the cake.

Tip 8: Secure the top edges first
Once you've rolled it onto the cake, secure all around the very top first. This will prevent the weight of the fondant from pulling away from the edge and tearing your fondant. The other thing that helps prevent fondant from tearing and breaking is the glycerine and shortening you added when you kneaded the fondant earlier as well as using a scant amount of corn starch (or powdered sugar).

Tip 9: Lift up and in
Now you're going to work your way down from the top, smoothing out the fondant. Work your way around the cake, smoothing a half inch to an inch at a time all the way around, then keep going around until you get to the bottom. Sounds easy, no? This is the moment of truth. The trick? As you smooth with one hand, use your other hand to lift up the excess fondant on the bottom and push in towards the cake just slightly. It sounds completely counterintuitive, but just try it. Up and in. All that excess will help you with this. Keep lifting as you smooth down.

Tip 10: Cut, smooth, cut
Once you've smoothed it all out with your hands all the way around, cut off all the excess with a pizza or pastry cutter.

Then use a fondant smoother to smooth it all down. Push in and move it up and down all around the cake. You'll end up with a little bit more along the bottom edge. Use your cutting wheel to cut it again as close as you can to the bottom edge.


Tip 11: Use a butter knife to get a clean edge
Are you always putting something around the bottom of your cake to hide that ragged edge? I take a butter knife and work my way around, using it to gently remove and/or tuck in any excess underneath and create a nice smooth edge.

If there's still a lot you didn't get, use the pizza cutter again. If it's just a tiny bit stuck to the cake board, you can scrape it off the cake board with the butter knife. If there's some that is uneven, use the butter knife to press it gently up into the cake.

That's it! Now you have a smooth cake with no folds or pleats and a nice clean edge along the bottom. Now you don't have to worry about positioning your decorations to cover up your mistakes!
UPDATE Jan 3, 2015- Thanks so much to everyone for your comments and questions. I had no idea so many people would find this so helpful when I published it a little over four years ago! :) Here are answers to some frequently asked questions from the comments:
Q. I don't have any glycerine and can't find it! Where do you buy it? (And can I use something else like extra shortening instead?)
A. I'm not aware of anything that provides the smoothness and elasticity of glycerine. You do need to make sure you are purchasing food-grade glycerine (it's commonly used in cosmetics and there are non food-grade versions available). I buy mine locally at Whole Foods Market. It is the Now Foods brand in a 16 oz bottle and it's in the health and personal care aisle (near the shampoos and stuff, but don't worry, it's food-grade). It's available on Amazon.com here. You can also buy it online at various health and vitamin type shops and also at places like Drugstore.com and Soap.com.
Q. What is shortening?
A. Shortening is a kind of fat that is solid at room temperature. It's basically oil that is solid. Some people call it "Crisco" which is a popular brand name in the US. I prefer to use Spectrum brand organic shortening which I buy at Whole Foods. Crisco will work, though.
Q. What can I use to brush on the cake to adhere the fondant? I saw you mention piping gel but I don't have that.
A. I don't use piping gel either so don't worry! If you do happen to want some, you can buy it at most craft stores like Jo-Ann, Michaels, or Hobby Lobby. But it's not necessary at all. You can use a little water on your pastry brush or you can use water with a bit of tylose powder dissolved in. Tylose is great to have around as a cake maker anyway because you can mix it with fondant when you make fondant figures so that they will harden.
Q. What kind of fondant do you use?
A. I make my own. I like this recipe.
Q. Do you cover your cake at room temperature or chilled?
A. Definitely chilled. You want that buttercream (or ganache) as hard as possible. Chill it for at least an hour.
Q. Do I have to put icing under my fondant?
A. Yes. Icing is not optional.
Q. Meringue buttercream sounds intriguing. Do you have a recipe?
A. As a matter of fact, I do! Right here.
Q. How thick should the fondant be when it's rolled out?
A. I roll it out between 1/8-1/4" thick.
Q. How can I get sharp squared-off edges on my cake?
A. There are a couple of methods to get that crisp squared-off edge. Personally, I put the whole cake into the fridge for a bit to get the fondant to start to firm up. Then I go all around the cake and sort of pinch it between my fingers. I've also watched a youtube video of a lady that used two fondant smoothers to sort of smoosh them against each other towards the edge. Finally, there are some people that actually flip the cake over onto it's top and smooth downward, then let it set in the fridge and chill and then flip it back over. But really, the first, pinching method is my go-to if I want that nice squared off look. Here's an example of one that I used the pinching and you can see it just looks nice and squared-off. You can't tell it was pinched!
Sunday, September 19, 2010
recent cakes
I'm quite behind on posting some of my recent cakes. Click on the thumbnails to see larger versions on my flickr page.
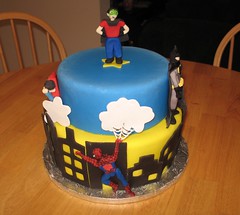
First up is a superhero cake. She wanted Batman, Spiderman, Superman and "Super Zach" (the birthday boy).
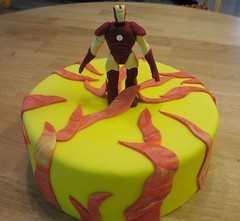
The same weekend, I had another birthday boy wanting a superhero. This one just wanted Iron Man. I made him coming up out of some flames. The flames didn't come out quite how I wanted, but the birthday boy was quite pleased.
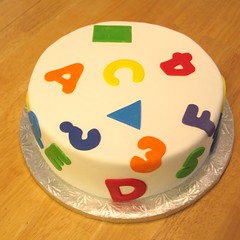
Next up is a simple, but cute cake. The birthday boy wanted shapes, letters, and numbers in rainbow colors (remember Roy G. Biv?).
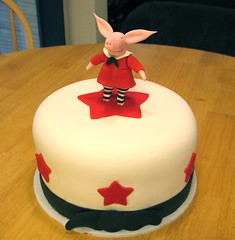
Then I did a cute little Olivia cake for a friend for her daughter's second birthday. I told her if she baked and iced the cake, I'd put fondant decorations on it. We couldn't get her icing to set up so when I put the fondant on it, it rounded out the top. However, I love the effect and I'm going to have to make a cake in the future that has that rounded look because it really came out cute. Sometimes things that seem like a disaster work out in the end!
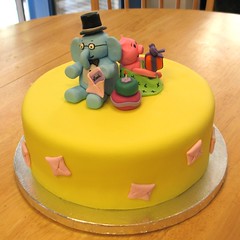
Finally, this weekend, I made a cake based on the book, I Am Invited to a Party! (An Elephant and Piggie Book) . Everything went so smoothly for this cake. For this one, I also took photos of my entire fondant-covering process and I'll make a post soon with tips and tricks to make covering a cake in fondant easier.
Disclosure: This blog contains affiliate links. This means that if you click on a link, I may earn a commission if you make a purchase via that link, at no additional cost to you. Thanks for your support! :)
First up is a superhero cake. She wanted Batman, Spiderman, Superman and "Super Zach" (the birthday boy).
The same weekend, I had another birthday boy wanting a superhero. This one just wanted Iron Man. I made him coming up out of some flames. The flames didn't come out quite how I wanted, but the birthday boy was quite pleased.
Next up is a simple, but cute cake. The birthday boy wanted shapes, letters, and numbers in rainbow colors (remember Roy G. Biv?).
Then I did a cute little Olivia
Finally, this weekend, I made a cake based on the book, I Am Invited to a Party! (An Elephant and Piggie Book)
Disclosure: This blog contains affiliate links. This means that if you click on a link, I may earn a commission if you make a purchase via that link, at no additional cost to you. Thanks for your support! :)
Sunday, August 8, 2010
Italian Meringue Buttercream
This is my favorite icing in the whole world (which is saying a lot because I'm not usually a big fan of icing). This is a traditional, basic Italian Meringue Buttercream (not my own recipe). Don't let the amount of butter scare you. This icing is so beautiful and smooth. It spreads like a dream and isn't overly sweet with a rich buttery flavor. This is the real deal and while it takes a little bit to make, it's worth it. I promise.
If you are making my strawberry cake recipe, I highly recommend saving aside the strawberry juice (left over after you made strawberry puree) and substitute the juice for the water in the syrup. If you want a lemon meringue buttercream, beat in some lemon curd (this is a great use for the leftover yolks). You can also beat in a variety of other flavors (almond extract, peppermint extract, etc.) If you are making another flavor (like using lemon curd or strawberry), use half the amount of vanilla called for.
1 C sugar
1/3 C water
4 large egg whites
1 tsp cream of tartar
5 sticks (2.5 cups) unsalted butter (at room temp) pinch salt
1 Tbsp vanilla
1. In a saucepan combine sugar and water and bring to a boil, stirring until sugar is dissolved.
2. Simmer syrup for 3-5 minutes.
3. While the syrup is on the stove, in a standing electric mixer beat egg whites using the the paddle attachment with a pinch of salt until foamy.
4. Beat in cream of tarter and continue beating the whites until they just hold stiff peaks.
5. While the mixer is running, slowly pour in the sugar syrup (hot off the stove) in a stream, avoiding the beater blade.
6. Beat mixture at medium speed until completely cool, around 15-20 minutes.
7. Beat in the butter, 1 tablespoon at a time, and continue to beat until it is thick and smooth. If it looks lumpy or curdled/oily, just keep beating. Crank up that mixer and beat until it is nice and smooth. It might take awhile - just keep beating! The key here is that the butter and the egg white/sugar mixture needs to be as similar a temperature as possible. If they didn't start that way, they will end up there if you just keep beating.
8. Once it reaches the proper consistency, beat in the vanilla.
If you are making my strawberry cake recipe, I highly recommend saving aside the strawberry juice (left over after you made strawberry puree) and substitute the juice for the water in the syrup. If you want a lemon meringue buttercream, beat in some lemon curd (this is a great use for the leftover yolks). You can also beat in a variety of other flavors (almond extract, peppermint extract, etc.) If you are making another flavor (like using lemon curd or strawberry), use half the amount of vanilla called for.
Italian Meringue Buttercream
Enough to ice a double-layer 9 or 10-inch cake.1 C sugar
1/3 C water
4 large egg whites
1 tsp cream of tartar
5 sticks (2.5 cups) unsalted butter (at room temp) pinch salt
1 Tbsp vanilla
1. In a saucepan combine sugar and water and bring to a boil, stirring until sugar is dissolved.
2. Simmer syrup for 3-5 minutes.
3. While the syrup is on the stove, in a standing electric mixer beat egg whites using the the paddle attachment with a pinch of salt until foamy.
4. Beat in cream of tarter and continue beating the whites until they just hold stiff peaks.
5. While the mixer is running, slowly pour in the sugar syrup (hot off the stove) in a stream, avoiding the beater blade.
6. Beat mixture at medium speed until completely cool, around 15-20 minutes.
7. Beat in the butter, 1 tablespoon at a time, and continue to beat until it is thick and smooth. If it looks lumpy or curdled/oily, just keep beating. Crank up that mixer and beat until it is nice and smooth. It might take awhile - just keep beating! The key here is that the butter and the egg white/sugar mixture needs to be as similar a temperature as possible. If they didn't start that way, they will end up there if you just keep beating.
8. Once it reaches the proper consistency, beat in the vanilla.
Sunday, July 11, 2010
Farm animals cake

Emmaline's birthday cake
Originally uploaded by anricat
My daughter loves cows and ducks so I thought for her birthday I'd make her a cake with farm animals on it.
The cake was neapolitan: strawberry, vanilla, and chocolate with strawberry filling and vanilla italian meringue buttercream icing. The washtub was also cake (vanilla and strawberry with chocolate icing).
Saturday, January 16, 2010
Scratch Strawberry Cake
When I needed to make a strawberry cake, I had a heck of a time finding one from scratch. I didn't necessarily need it to use fresh strawberries, I just needed it to not be made from a box of white cake combined with a box of strawberry jell-o. (Do a Google search for strawberry cake recipe and you'll see what I mean.)
I did find a couple of scratch recipes and tried one of them, but found it to be too sweet and not enough strawberry flavor. So eventually I developed my own based on a white cake recipe I had. My first attempt was also too sweet (strawberries are pretty sweet so it's hard to get a good strawberry flavor without being too sweet) and also not enough strawberry in flavor.
I like baking 10-inch cakes so this recipe makes two 10-inch cakes. You can halve it (use 3 eggs if you halve it) to get one 10-inch cake, or two 8-inch cakes out of a half recipe.
Summer's Strawberry Cake
5 C cake flour
2 Tbsp + 1 tsp baking powder
1/2 tsp baking soda
2 tsp salt
1 1/3 C butter
2 2/3 C sugar
5 eggs
8 oz sour cream
2 2/3 C strawberry puree*
1 Tbsp vanilla
10-15 drops red food coloring (optional **)
Grease and flour cake pans and preheat oven to 350. Sift flour, baking power, baking soda and salt together and set aside. Cream butter and sugar together. Beat the eggs and beat in slowly, scraping the bowl down halfway through. Combine sour cream, strawberry puree and vanilla (and food color if using) in a small bowl. Add flour and strawberry mixture in alternating batches beginning and ending with the flour. Pour into cake pans and bake 30-40 min (depending on size of cake pans).
* Strawberry puree - Take 32 oz of frozen strawberries and defrost. Strain out the juice (set aside the juice to use in your frosting if you desire) and puree the strawberries in a food processor until smooth. After making the cake, you will have about 3/4-1 C of strawberry puree remaining that you can use between the layers of your cake.
** This cake has a brownish color when baked so if you're looking for a pink cake, you'll need to add a little color. When cooking for myself, I don't care about the color of the cake, but for a child's birthday cake, I add a little red food coloring to give it a slightly pink color.
Friday, January 15, 2010
Fairy cake

fairy cake
Originally uploaded by anricat
A friend asked me to make a cake for her daughter's birthday party tomorrow. She wanted a fairy-themed cake. I sculpted the fairy (my first human-ish figure) all out of fondant. The toadstool is cake covered in fondant.
She wanted a strawberry cake and I don't have a go-to strawberry cake recipe. I looked around online and I found a lot of strawberry cake recipes, but none of them used actual strawberries. (Huh?!) Most of them used strawberry jell-o (and most of them combined a box of white cake with a box of strawberry jello). I'm pretty sure the birthday girl wouldn't have cared, but that's just not me. I wanted strawberry cake with REAL strawberries. From scratch. I'm not a box cake baker.
So I found a recipe, tried it out and it was okay, I suppose. It wasn't OMG NOM NOM yummy so I found a recipe for a basic white cake and set out to turn it into a strawberry cake. My first attempt was actually pretty good, but it was a little too sweet and not quite strawberry enough. So I adjusted it again when making this cake. I saved aside a small amount of batter for a taster cupcake so I could see how it came out and it is now perfect.
I paired it with a strawberry italian meringue buttercream which I made with strawberry juice (again, my own creation based on a vanilla meringue buttercream). The juice was left after defrosting the strawberries which were frozen, on purpose, because freezing allows for a better puree for baking (and leftover juice). Someone has probably already made a strawberry meringue buttercream before - I can't imagine this is a new idea, but it worked well and made a delicious frosting.
I also had some strawberry puree left after making the cake so I slapped that between the layers. I sure wish I was having a piece. It looks delicious! I'll post the recipe soon. It's definitely a keeper!
Sunday, January 10, 2010
homemade biscuits
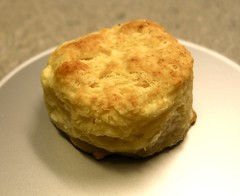
homemade biscuit
Originally uploaded by anricat
There are things I've made that are time consuming and require a lot of work and technique. Then there are things that seem like they would be difficult, but really, aren't that tough. Pie crust and biscuits fall into the latter category.
We've been making pie crust in our household from scratch for a number of years now. Once we figured out how easy it is, we never bought another pie crust. I've learned that biscuits are similarly easy. I started with Alton Brown's biscuits from his baking book I mentioned previously. I found the dough from his biscuit recipe to be far too gooey and difficult to work. For me, this lead to some overworking of the dough as I tried to wrangle it into a form I could cut biscuits from. I also thought that they didn't need the egg his recipe called for. Alton Brown also likes to use frozen butter in his recipe. However, I find it to be too difficult to work with and unnecessary. Very well chilled butter right out of the fridge works just fine.
Here's my interpretation:
2 C flour
4 tsp baking powder
1 tsp salt
1/2 tsp baking soda
1/4 C (half stick) of cold butter
1/3 C plain, whole milk yogurt
2/3 C milk or buttermilk
1. Preheat oven to 450 degrees.
2. Whisk the flour, baking powder, baking soda, and salt together in a bowl.
3. Cut the butter into tablespoon-sized chunks and add it to the flour mixture.
4. Using your fingertips, work the butter into the flour (using a rubbing motion) until the butter pieces are approximately pea sized.
5. In a separate container, mix the wet ingredients together, then pour them into the flour/butter mixture.
6. Gently mix the batter by hand until it begins to come together.
7. Turn out the dough onto a work surface dusted with flour.
8. Using your hands, fold the dough back onto itself a few times. (Just fold it in half 3-4 times gently.)
9. Gently press the dough out with your palms until it's about a half inch thick.
10. Cut out your biscuits using a round pastry cutter or biscuit cutter.
11. Lay your biscuits out on a baking sheet so the edges are just touching.
12. Using your index finger, gently make an indention in the center of each biscuit (to promote even rising).
13. Bake 10-12 minutes (this may vary depending on the size of biscuits you cut) at 450 until golden brown.
Disclosure: This blog contains affiliate links. This means that if you click on a link, I may earn a commission if you make a purchase via that link, at no additional cost to you. Thanks for your support! :)
Thursday, January 7, 2010
Mini Palmiers

mini palmiers
Originally uploaded by anricat
Palmiers are some of my all-time favorite cookies. While my puff pastry dough isn't perfect, it's serviceable enough to create these little babies. While you can't really tell from the photo, they are very small - maybe two bites. I just pop them in one at a time though. They are less messy than very large palmiers (which can be unwieldy with their delicious sticky crumbliness) but dangerous when you realize how many you've eaten. Maybe I need to make myself some 100-calorie packs. That would be, what, two mini palmiers? ;)
Tuesday, January 5, 2010
self-teaching
There's something empowering about learning to do something on your own. You have to research and figure things out. And when you get stuck, you have to work your way out of the situation. On the other hand, it can be very frustrating when things don't go right and you can't figure out what is going wrong.
Since I'm teaching myself to bake, I thought perhaps I should take a stab at puff pastry. It seems like something I should know how to do as an aspiring baker. I hesitate to use the term "pastry chef" because I'm not certain that's what I would like to be when I grow up. (But you never know!)
The current standings are:
Puff Pastry - 2
Summer - 0
It's not going so well so far. The result is fine, I suppose, but it isn't right. It's marbled with butter as opposed to being layered with butter and I can't quite figure out where I'm going wrong. This is where I need a real life (not a youtube) demo.
In other news, I've been reading Alton Brown's book, I'm Just Here for More Food: Food x Mixing + Heat = Baking and it's been a good read so far. Last night I made his biscuit recipe and while I overcooked them slightly, they were still tasty. The dough was very wet and sticky and that tripped me up a bit. I think I'll try them again and modify the recipe slightly next time.
I also baked up a batch of chocolate chocolate chip cookies today and they are delicious. I have eaten far too many (my quick run did not even come close to evening that out) but I could not stop myself. I got the recipe online somewhere and I cannot now remember where. I'll have to find it and link to it because it's definitely a keeper!
Disclosure: This blog contains affiliate links. This means that if you click on a link, I may earn a commission if you make a purchase via that link, at no additional cost to you. Thanks for your support! :)
Since I'm teaching myself to bake, I thought perhaps I should take a stab at puff pastry. It seems like something I should know how to do as an aspiring baker. I hesitate to use the term "pastry chef" because I'm not certain that's what I would like to be when I grow up. (But you never know!)
The current standings are:
Puff Pastry - 2
Summer - 0
It's not going so well so far. The result is fine, I suppose, but it isn't right. It's marbled with butter as opposed to being layered with butter and I can't quite figure out where I'm going wrong. This is where I need a real life (not a youtube) demo.
In other news, I've been reading Alton Brown's book, I'm Just Here for More Food: Food x Mixing + Heat = Baking
I also baked up a batch of chocolate chocolate chip cookies today and they are delicious. I have eaten far too many (my quick run did not even come close to evening that out) but I could not stop myself. I got the recipe online somewhere and I cannot now remember where. I'll have to find it and link to it because it's definitely a keeper!
Disclosure: This blog contains affiliate links. This means that if you click on a link, I may earn a commission if you make a purchase via that link, at no additional cost to you. Thanks for your support! :)
Subscribe to:
Posts (Atom)