Saturday, January 16, 2010
Scratch Strawberry Cake
Friday, January 15, 2010
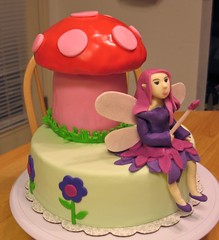
Fairy cake

fairy cake
Originally uploaded by anricat
A friend asked me to make a cake for her daughter's birthday party tomorrow. She wanted a fairy-themed cake. I sculpted the fairy (my first human-ish figure) all out of fondant. The toadstool is cake covered in fondant.
She wanted a strawberry cake and I don't have a go-to strawberry cake recipe. I looked around online and I found a lot of strawberry cake recipes, but none of them used actual strawberries. (Huh?!) Most of them used strawberry jell-o (and most of them combined a box of white cake with a box of strawberry jello). I'm pretty sure the birthday girl wouldn't have cared, but that's just not me. I wanted strawberry cake with REAL strawberries. From scratch. I'm not a box cake baker.
So I found a recipe, tried it out and it was okay, I suppose. It wasn't OMG NOM NOM yummy so I found a recipe for a basic white cake and set out to turn it into a strawberry cake. My first attempt was actually pretty good, but it was a little too sweet and not quite strawberry enough. So I adjusted it again when making this cake. I saved aside a small amount of batter for a taster cupcake so I could see how it came out and it is now perfect.
I paired it with a strawberry italian meringue buttercream which I made with strawberry juice (again, my own creation based on a vanilla meringue buttercream). The juice was left after defrosting the strawberries which were frozen, on purpose, because freezing allows for a better puree for baking (and leftover juice). Someone has probably already made a strawberry meringue buttercream before - I can't imagine this is a new idea, but it worked well and made a delicious frosting.
I also had some strawberry puree left after making the cake so I slapped that between the layers. I sure wish I was having a piece. It looks delicious! I'll post the recipe soon. It's definitely a keeper!
Sunday, January 10, 2010
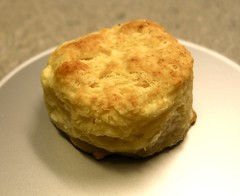
homemade biscuits

homemade biscuit
Originally uploaded by anricat
There are things I've made that are time consuming and require a lot of work and technique. Then there are things that seem like they would be difficult, but really, aren't that tough. Pie crust and biscuits fall into the latter category.
We've been making pie crust in our household from scratch for a number of years now. Once we figured out how easy it is, we never bought another pie crust. I've learned that biscuits are similarly easy. I started with Alton Brown's biscuits from his baking book I mentioned previously. I found the dough from his biscuit recipe to be far too gooey and difficult to work. For me, this lead to some overworking of the dough as I tried to wrangle it into a form I could cut biscuits from. I also thought that they didn't need the egg his recipe called for. Alton Brown also likes to use frozen butter in his recipe. However, I find it to be too difficult to work with and unnecessary. Very well chilled butter right out of the fridge works just fine.
Here's my interpretation:
2 C flour
4 tsp baking powder
1 tsp salt
1/2 tsp baking soda
1/4 C (half stick) of cold butter
1/3 C plain, whole milk yogurt
2/3 C milk or buttermilk
1. Preheat oven to 450 degrees.
2. Whisk the flour, baking powder, baking soda, and salt together in a bowl.
3. Cut the butter into tablespoon-sized chunks and add it to the flour mixture.
4. Using your fingertips, work the butter into the flour (using a rubbing motion) until the butter pieces are approximately pea sized.
5. In a separate container, mix the wet ingredients together, then pour them into the flour/butter mixture.
6. Gently mix the batter by hand until it begins to come together.
7. Turn out the dough onto a work surface dusted with flour.
8. Using your hands, fold the dough back onto itself a few times. (Just fold it in half 3-4 times gently.)
9. Gently press the dough out with your palms until it's about a half inch thick.
10. Cut out your biscuits using a round pastry cutter or biscuit cutter.
11. Lay your biscuits out on a baking sheet so the edges are just touching.
12. Using your index finger, gently make an indention in the center of each biscuit (to promote even rising).
13. Bake 10-12 minutes (this may vary depending on the size of biscuits you cut) at 450 until golden brown.
Disclosure: This blog contains affiliate links. This means that if you click on a link, I may earn a commission if you make a purchase via that link, at no additional cost to you. Thanks for your support! :)
Thursday, January 7, 2010
Mini Palmiers

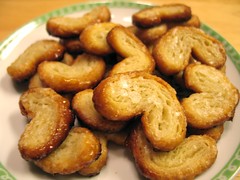
mini palmiers
Originally uploaded by anricat
Palmiers are some of my all-time favorite cookies. While my puff pastry dough isn't perfect, it's serviceable enough to create these little babies. While you can't really tell from the photo, they are very small - maybe two bites. I just pop them in one at a time though. They are less messy than very large palmiers (which can be unwieldy with their delicious sticky crumbliness) but dangerous when you realize how many you've eaten. Maybe I need to make myself some 100-calorie packs. That would be, what, two mini palmiers? ;)
Tuesday, January 5, 2010
self-teaching
Since I'm teaching myself to bake, I thought perhaps I should take a stab at puff pastry. It seems like something I should know how to do as an aspiring baker. I hesitate to use the term "pastry chef" because I'm not certain that's what I would like to be when I grow up. (But you never know!)
The current standings are:
Puff Pastry - 2
Summer - 0
It's not going so well so far. The result is fine, I suppose, but it isn't right. It's marbled with butter as opposed to being layered with butter and I can't quite figure out where I'm going wrong. This is where I need a real life (not a youtube) demo.
In other news, I've been reading Alton Brown's book, I'm Just Here for More Food: Food x Mixing + Heat = Baking
I also baked up a batch of chocolate chocolate chip cookies today and they are delicious. I have eaten far too many (my quick run did not even come close to evening that out) but I could not stop myself. I got the recipe online somewhere and I cannot now remember where. I'll have to find it and link to it because it's definitely a keeper!
Disclosure: This blog contains affiliate links. This means that if you click on a link, I may earn a commission if you make a purchase via that link, at no additional cost to you. Thanks for your support! :)